In this tutorial, we will learn how to calculate semitone values for the individual partials in the harmonic series, and create a filter effect based on this, as well as modify this effect so that we can remove partials at will from sounds.
The tutorial assumes knowledge of Bitwig’s basic functionality.
The harmonic series is a series of frequencies above the fundamental of the note, and their placement is usually a series of multiples of the fundamental. So for a note with a fundamental frequency of 100hz the first harmonics are at 200hz, 300hz, 400hz and so on to infinity.
From that we can see that the relationship of the first partial is that of an octave, but after that it gets more complicated, and very few of the partials fall at exact frequencies of any note in the typical 12-tone scale.
The third harmonic is an octave and fifth, the fourth two octaves, and after that the relationship gets more uneven. Only the octaves are an constant, since they appear by necessity in the series. Third octave is the 8th harmonic, fourth octave the 16th, and so on.
To calculate the exact semitone value for any partial, you would use the formula: 12*log2(N).
Translated to Open Office Calc, that would be “=12*LOG(N;2)”, where in both N is the number of harmonic you are interested.
I suck at maths, thanks KVR for this info!
The semitone values above a fundamental for the first 16 partials are thus:
1 0
2 12
3 19,020
4 24
5 27,863
6 31,020
7 33,688
8 36
9 38,039
10 39,863
11 41,513
12 43,020
13 44,405
14 45,688
15 46,883
16 48
Let’s do a parallel bandpass filter bank, where each filter is centered on one frequency.
We could calculate hz values and insert those values by hand for the cutoff of each filter. Editing the whole patch however would be painful.
A more flexible approach is to assign a button for each partial, this way we can have the modulation values visible for each partial at once like this (don’t care about that mute value, I will explain it later):
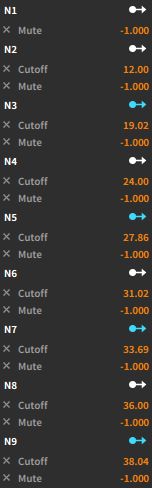
Luckily the Filter module works in a clever way in Bitwig, and the incoming modulation amount defaults to partials. So a modulation value of +12 would mean an octave above the setting of the cutoff knob.
Bitwig also takes into account more decimals than what it shows in all fields where a number can be inserted. This is confusing when editing patches, but good to keep in mind since it can make a difference especially when dealing with frequencies.
I’m not going step by step since this is an easy procedure:
Create a FX Layer, and place a Filter device there. Control click on cutoff and set the value to “c0”. This will calculate automatically the hz value for that note which will save some time.
Duplicate the layer, and create a button at the layer top level that modulates the cutoff value at +12.
Go on creating as many layers as you want. I made nine, and four sub-harmonics (-12, -19.02, -24 and -27.863).
Create a macro offset knob to sweep the filter, modulate the cutoff in the first layer an amount you like, ctrl+right click and use the “copy modulation to all layers” function.
Now you can switch off peaks at individual harmonics. Notice that unless you make the button also turn the layers off, they will keep sounding at the fundamental frequency even when the buttons are depressed since that’s their default cutoff. A way to avoid this is to set all layers to mute, and then make the same buttons that set the modulation turn the mute button off.
You will also probably need to lower the volume of the filters to avoid clipping.
So far so good, now the horizon really opens up for us.
Now it’s possible to have FX chains for individual partials, use pitch or frequency shifters to modulate their pitch, put delays on them, and so on.
To make it possible to turn individual harmonics on or off we need to use a series of keytracked notch filters.
The keytrack modulator is regrettably one of the more confusing devices in Bitwig, and the documentation leaves us clueless about the functioning: “A five-point piecewise function for transforming incoming note messages” is the only information given in the manual.
The first mode “absolute” is a traditional tracking curve that is quite easy to understand, but quite useless for precision tracking over several octaves. “Relative” mode is the one to use in all situations where you need a constant tracking over several octaves. It will apparently cumulate the given modulation for each octave. So if modulation is at +12 and you play a note two octaves above the modulator’s root, a modulation amount of +24 is sent forward… I think.
Set root to 24, spread to 64 and modulation of each filter to +64. Again, do it only once, and use the: “copy modulation to all layers” function.

Don’t ask me why root isn’t 0 in the configuration, that might be because of the fact that the cutoff values of the filters are not zero to begin with.
Now place the filters in a series instead, and make the buttons turn them on and off. I recommend also creating a macro to set the resonance of all layers so the notch width can be set. Notice, that the effect is dependent on incoming MIDI signals to decipher the fundamental frequency of the sound.
Here is a download link to a project with both effects dropped inside a Polysynth. No fancy macro controls or fine tuning, this should be just a source of inspiration for further ideas and modification!